

Healthcare provider FAQ
Working Together is Critical for the Best Patient Care
Every individual has different needs and co-morbidities that must be taken into consideration. Find helpful information below for patient compliance, proper fit, gait tips, specifics of different components, and help with designing the best orthosis or prosthesis for the patient.
Free CEU Course
We offer a free CEU class (1 CEU credit by the APTA) that you can take in-person or online. For the in-person course, feel free to contact your local Limbionics office for more information. If you are interested in the online course, use the “Take the CEU Course” button below.
FAQ: Find the Answers You Need
Use the categories below to jump to the answers you need.
Paperwork and Insurance
The necessary paperwork is based on the insurance requirements specified by the insurance company. Most require a detailed order/ prescription which we will provide for a physician’s signature. Then they will require a face-to-face visit note with certain points documented. The points come from the Medicare “Dear Physician Letter” which came out a few years ago stating what physicians are required to document in order for a prosthesis to be approved for a patient. This letter can be found here. As you can see in the letter from CMS, many points are needed including:
- K-level
- History of the present condition(s) and past medical history that is relevant to functional deficits or symptoms limiting ambulation or dexterity:
- Diagnoses causing these symptoms
- Other co-morbidities relating to ambulatory problems or impacting the use of a new prosthesis
- What ambulatory assistance (cane, walker, wheelchair, caregiver) is currently used (either in addition to the prosthesis or prior to amputation)
- Description of activities of daily living and how impacted by deficit(s)
- Physical examination that is relevant to functional deficits
- Weight and height, including any recent weight loss/gain
- Cardiopulmonary examination
- Musculoskeletal examination/ Arm and leg strength and range of motion
- Neurological examination
- Gait
- Balance and coordination
We will typically include a cover letter with our assessment attached. Our assessment will include all of the above points, and can be used for your reference.
Medicare established K levels, which are functional categories for amputees, in 1995 as a means to quantify need and the potential benefit of prosthetic devices for patients after lower limb amputation. The rating system is still used today by Medicare, Medicaid, and many other insurance companies to determine eligibility for payment or reimbursement of parts of prostheses.
- Level 0: Does not have the ability or potential to ambulate or transfer safely with or without assistance and a prosthesis does not enhance their quality of life or mobility.
- Level 1: Has the ability or potential to use a prosthesis for transfers or ambulation on level surfaces at fixed cadence. Typical of the limited and unlimited household ambulator.
- Level 2: Has the ability or potential for ambulation with the ability to traverse low level environmental barriers such as curbs, stairs or uneven surfaces. Typical of the limited community ambulator.
- Level 3: Has the ability or potential for ambulation with variable cadence. Typical of the community ambulator who has the ability to traverse most environmental barriers and may have vocational, therapeutic, or exercise activity that demands prosthetic utilization beyond simple locomotion.
- Level 4: Has the ability or potential for prosthetic ambulation that exceeds basic ambulation skills, exhibiting high impact, stress, or energy levels. Typical of the prosthetic demands of the child, active adult, or athlete.
Patient's Rights
An evaluation with a prosthetist is free, so we always say to use us as a resource to answer any questions or to provide a second opinion.
Selecting a Prosthetist
Patients will be working extremely closely with a prosthetist during the process of amputation, recovery, and receiving a prosthetic limb. The relationship between patient and prosthetist will be very close.
Patients have the right to change and choose their prosthetist. You should help patients decide on a prosthetist and know their rights to the best care. It is essential to know a prosthetist’s credentials, reputation, and experience. This choice is not one to take lightly. A prosthesis that is designed and fits incorrectly could actually cause damage and injury. With the correct design and fit of a well-made prosthesis, the quality of life for the patient can be drastically improved.
Some key questions to ask before choosing a prosthetist:
- Are they certified? If so, by who? ABC vs. BOC
- Do they specialize in a specific type of patient population or prosthesis?
- Do they seem friendly and knowledgeable?
- Do they offer the newest and most advanced technology on the market?
- When speaking with them, did you feel a connection or a disconnect? Is there trust in their knowledge and follow-up care?
No. Prosthetic & orthotic facilities are contracted with insurance companies and are only allowed to bill at the designated and contracted rate. Attempting to attract patients by charging less than the contracted rate is not allowed.
Any practitioner who claims that they can “get you a deal” or “get you a cheaper leg” is not only fraudulent, they are also being dishonest. Honesty and ethical behavior are principles we stand by and should be qualities you look for before selecting a prosthetist to design your prosthesis.
Although we have contracts with most insurance companies, if we happen to not have a contract in place with a particular insurance plan, we will make every effort to keep costs minimal and will attempt to negotiate rates with that insurance company.
Yes, Limbionics offices love doing pre-amputation consults whenever possible. We feel this helps reduce anxiety and gives patients a greater understanding of what is to come and how they can proceed with their life with a prosthesis. Post-amputation consultations are also extremely valuable because we are able to answer any questions they may have after the surgery and also see how their particular surgery went to give more specific information.
Post Amputation Care
Shrinkers
Prosthetic shrinkers are elastic garments that control swelling, promote healing, and assist in shaping the residual limb properly.
Shrinkers help by compressing and shaping the residual limb post-amputation by enhancing blood circulation to the area and reducing fluid accumulation. Wearing shrinkers will prepare the residual limb for prosthetic fitting by reducing “dog ears” and contouring the residual limb. Also, it has been found that shrinker wear can greatly reduce phantom limb pains, promote wound healing post-operatively, and reduce swelling.
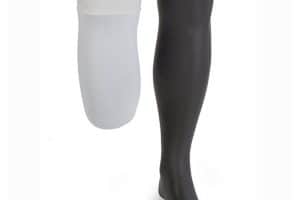
There are different styles of shrinkers available. Some are a single layer to pull on and some have two layers that are reflected over each other.
 Every time the shrinker is applied, you should make sure that the bottom of the shrinker is pulled snug to the bottom of the residual limb and that there are no wrinkles in the material.
Shrinkers will be worn essentially all day and night, only removing it to bathe. Every time the shrinker is removed, perform a thorough skin inspection.
Follow the washing instructions provided by the manufacturer. Hand wash the shrinker using a mild soap and hang to dry. Patients will be provided at least two shrinkers, so they can wear one and wash one. Wash and proper care usually will restore the shrinkers shape as wearing a shrinker for long durations can stretch it out.
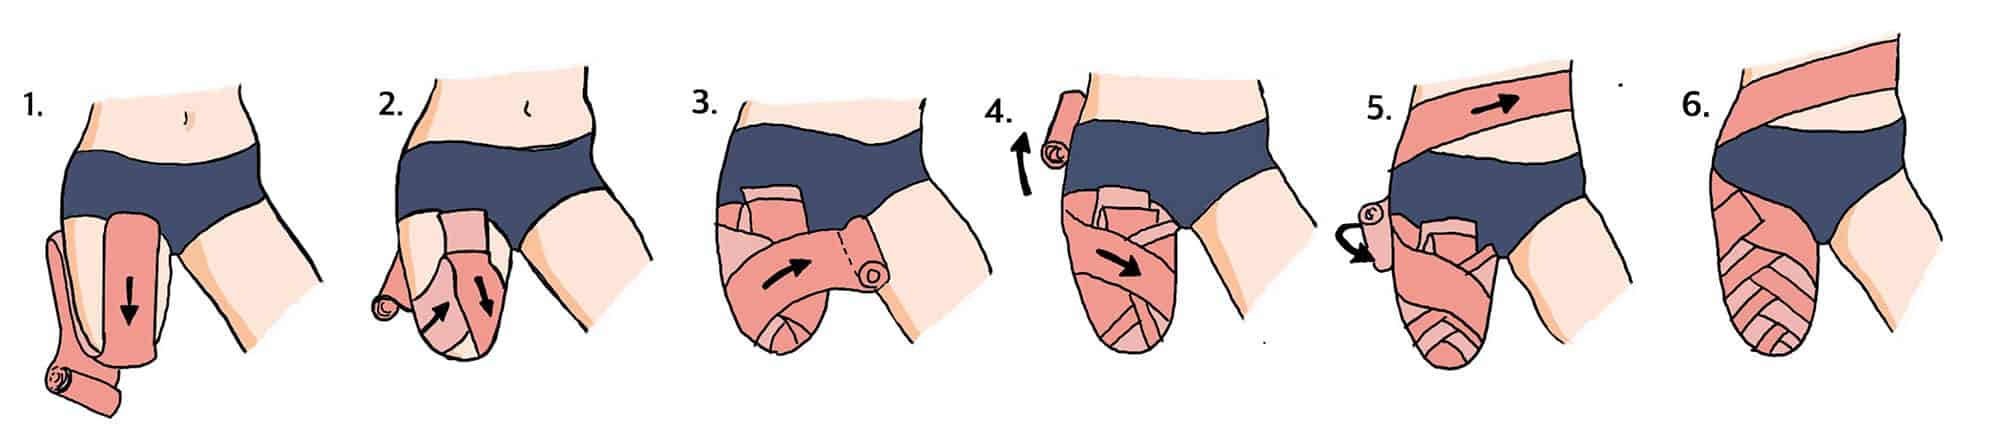
Figure-of-8 wrap
If a shrinker is not available you can use a figure-of-8 wrap with an ace wrap. Always ensure staples or sutures are covered before doing a figure-of-8 wrap to ensure you do not pull on the suture line. Always ensure it is most snug distally and reduces in tension proximally. This ensures we are pushing the fluid proximally to the body. See the image below for an example of figure-of-8 wrap.
After an amputation surgery, it is very important to protect the end of the residual limb as much as possible. The incision site may be very tender, and it is important that the stitches or staples stay intact to allow quick healing. If the patient falls or bumps into something and the incision is not protected, it could set back their recovery and take longer for their leg to be ready for prosthetic fitting.
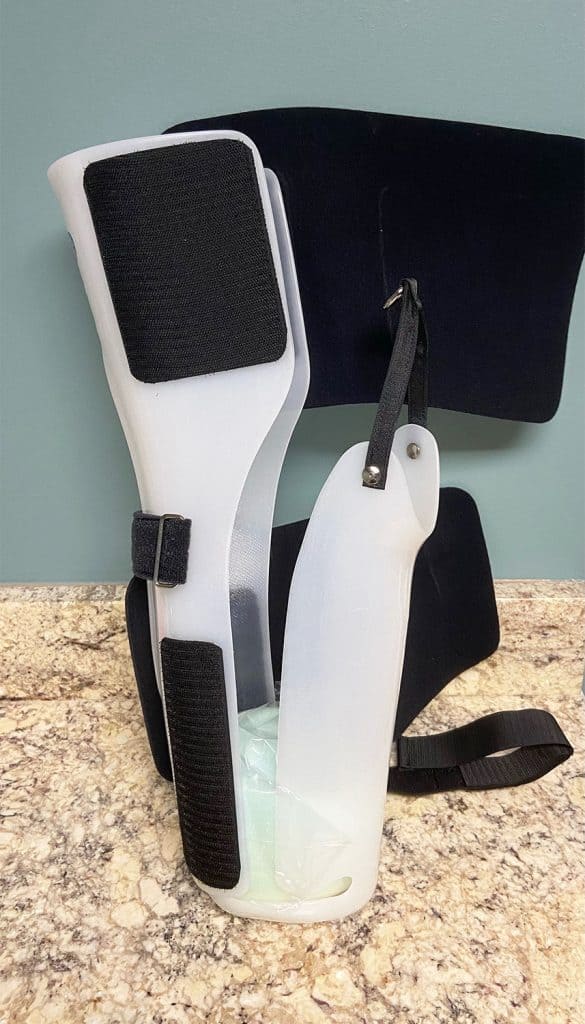
A limb protector is a plastic cover that you can put on the residual limb over the soft dressing that will cover and protect the residual limb. It will also help keep the knee in an extended position and prevent tightness of the muscles (contractures) which can complicate prosthetic fitting.
The limb protector is a molded piece of plastic that opens up to allow the leg to fit inside. It has soft padding in the end of the device to provide cushion and comfort. This padding should be hand washed with mild soap and water and air-dried.
The device closes around the leg to provide full protection. There is a strap in the front to attach a suspension belt if the patient is going to be standing to ensure that the limb protector does not slide down. This is useful if they are transferring in and out of a wheelchair, or if they are working on standing in physical therapy to maintain their strength, balance, and endurance.
Neoprene and Velcro straps keep the limb protector snug on the leg. This can help to prevent swelling and ensures that the limb protector does not rotate.
The patient should always wear the limb protector any time they are out of bed. The device is easy to put on and take off and allows easy access to the incision site for cleaning and changing of dressings. It is critical to protect and prevent reinjuring the leg as the incision heals to prevent delaying the fitting of their prosthesis.
This can vary. The most critical thing to know is that we cannot do much without the proper paperwork that insurance requires from an MD. Once we have the appropriate paperwork, the patient will have a casting appointment. Then they will have a test socket fitting; this could occur a day or 2 after the casting or may be later depending on the individual patient. The test socket allows us to see where pressures or voids in the socket may be before going to a definitive socket. Once we have completed the test socket, it is typically between 3-7 days to fabricate a definitive socket. We try to be very understanding of the patient’s situation, anxiety, excitement, and other co-morbidities that may affect the time frame or reasons for altering it.
Prosthetic Components
Liner – The liner is like a gel sock for your leg. It will protect your skin and provide cushion in the socket. This is a pin locking socket, so the gel liner has a pin in the end. This pin engages with the locking mechanism, making sure that the prosthesis stays on your leg when you are walking.
Suspension sleeve – This is used in a suction socket with a valve. A suspension sleeve fits over the socket and up onto the thigh. They are used to seal air into the socket to adhere the device to the limb. This tightness of the sleeve reduces the amount of excess movement while still allowing the knee to have some freedom and mobility.
Socket – The socket is the part of the prosthesis that goes onto your leg. To make the socket, we take a cast of your leg, so it is custom for your leg only. This can have any type of design or can match your skin tone.
Flexible Inner Socket – The flexible inner is a molded piece of soft plastic that fits inside the socket. It makes the hard edges of the socket more comfortable and can be removed if your leg is swollen to give you more room in the socket.
Lock/ Lanyard – The locking mechanism engages with the pin in the liner to keep the prosthesis on your leg. The lock fits into the bottom of the socket. To remove the prosthesis, push the silver button on the lock and slide your residual limb out of the socket. A lanyard is an alternative to a lock which uses a strap. The strap helps patient pull into the socket and help control rotation.
Pylon – The pylon acts as the “shin bone” to the prosthesis. It connects the socket to the foot. The pylon is cut to an appropriate length to make sure that your prosthesis not too tall or too short when you are walking. The prosthesis should be the same length as your other leg to make sure you can walk comfortably. Like the tube clamp adapter, there are screws on the bottom of the pylon to allow changes to the alignment, or angle, of the pylon in relation to the foot.
Foot – The foot is typically made with a fiberglass or carbon fiber material. It does not have true up and down motion like your ankle, but the material will deflect as you walk, giving you some range of motion. The foot provides stability as you walk. There are many different types of feet, and your prosthetist will choose one that is most appropriate for you based on your activity level, height, weight, and lifestyle. The foot size matches your other foot so you can use the shoes you already have.
Microprocessor knees are hydraulic or pneumatic units controlled by an internal computer. This computer uses sensors to monitor your gait pattern, which allows real time variations in resistance. This means that the hydraulic valves will provide different amounts of resistance if you increase or decrease your walking speed, without your prosthetist making manual adjustments. While there are some setbacks to this style of knee, including increased weight and having to charge the knee (similar to how you have to charge your cell phone battery), it also has many benefits which include:
- Providing stumble recovery—resistance automatically increases if the knee senses that you misstep or lose your balance, which prevents the knee from locking under you.
- Increased stability on uneven terrain
- Increased stability on ramps and stairs
- Real time swing (non-weight bearing) and stance phase (weight bearing) control
- Slows the extension of the knee as you swing your leg through (mimics natural, biomechanical movements)
- Some have different modes that you ca set, including free motion (no resistance; good for cycling) or fixed angle (full resistance that allows no range of motion).
It is well known that the microprocessor knees benefit K3 patients that commonly use variable speeds, but new studies are also beginning to show that they are beneficial in improving the gait and energy expenditure of K2 patients. The increased stability is also beneficial for short above knee and hip disarticulation patients with less leverage (shorter residual limbs).
Reference links:
- https://www.ossur.com/en-gb/prosthetics/knees/rheo-knee
- https://www.ottobockus.com/prosthetics/lower-limb-prosthetics/solution-overview/c-leg-above-knee-system/
- https://www.allux.info/contents/technology.html
Maintaining a prosthesis on the individual’s limb can be achieved several ways. The most common ways a below knee prosthesis is secured onto a patient are:
Gel Locking Liner with locking mechanism – This method uses a gel roll-on liner that adheres to the individual’s limb through skin contact and suction. At the end of the gel liner is a pin that engages a locking mechanism inside of the prosthesis. Once this pin is engaged within the lock, the individual and prosthesis are attached to one another. A simple release button allows the disengagement of the gel liner from the prosthesis.
Gel Locking Liner with Lanyard strap mechanism – This method uses the same roll-on gel locking liner; but instead of a pin, a nylon or similar strap is attached to the end. This allows the user to feed the strap down through the prosthesis and out an exit cut out so that the strap can be manually attached to the outside of the socket. The act of pulling the limb into the prosthesis makes for easier application but can be somewhat un-cosmetic.
Suction Sleeve Suspension with passive expulsion valve – This method uses a gel inner liner but without the locking mechanism umbrella attachment; then an outer sleeve that attaches to the top 1/3 of the prosthesis and rolls up onto a patient’s thigh. The use of an expulsion valve, at the bottom of the prosthetic socket, lets any air in the prosthesis out. This creates a closed system, and the prosthesis is held on by passive suction.
Suction Sleeve Suspension with Active Vacuum System – Active suction suspension utilizes the same roll-on gel liner, without the locking mechanism umbrella, and outer sleeve; however, the suction within the system is maintained and regulated by an external mechanism that actively pulls air out of the socket. This active vacuum can be a battery-operated pump or the mechanical action of components working in tandem to actively expel air from within the socket.
Every prosthesis is uniquely designed for the individual user. While not an exhaustive list of determining factors, the practitioner will perform a detailed assessment including the patient’s height, weight, previous activity level, vocation, comorbidities, and living arrangements, among others, to determine their functional level. These factors allow the practitioner to determine the highest strength/lowest weight components to use in the design of the prosthesis.
Liners can be made from several different types of materials:
- Silicone – provides good compression to the residual limb but has low padding, so the patient must have good soft tissue coverage (no prominent bones or scarring from burns).
- Thermoplastic Elastomer (TPE) – a very soft gel that will conform to residual limb and is good for patients with dry and sensitive skin or unique residual limb shapes.
- Polyurethane – provides good cushion and the gel flows away from high pressure areas such as prominent bones. This type of gel is especially good for patients with sensitive skin, bony residual limbs, or significant scarring.
- There is also a type of liner called a SmartTemp liner, which uses a gel that will regulate heat by responding to changes in your skin temperature; it absorbs and stores heat, which delays the onset of sweat.
The liners can come in different thicknesses and shapes as well as different gels. When you get your prosthetic leg, you will get 2 gel liners. To put the liner on, turn it completely inside out and make sure the bottom is flush against your skin. If there is space in the liner it can pull on the end of your residual limb and cause a blister to form. Make sure to roll the liner up your leg, do not pull it up using your fingernails. This can pull on your skin causing irritation, and your nails could cause a tear in the gel.
When you remove the liner, roll it all the way down. This will leave the liner inside out. Wash the gel with mild soap and water. Do not use a soap that has a lot of fragrance or exfoliating beads, as this can get stuck in the liner and irritate your skin. Make sure to rinse the liner completely and hang it to air dry. You should switch which liner you wear every other day. This will allow the liner to fully dry and allow the gel to rebound so the liner lasts longer. Only wear the liner during the day when you are wearing your prosthesis; do not sleep in the liner.
Your liners should be replaced every 6 months to ensure that your leg is being adequately protected. If you have any issues with tears or breakdown of the liners, call your prosthetist to see if you are due for new ones.
Prosthesis and Residual Limb Troubleshooting
Unfortunately, sweat is something that, to a certain degree, is going to happen no matter what. Most liners are made of a gel material, which retains heat and will not wick moisture away from your limb.
Excess sweat can cause several issues when using a prosthesis. First, excess sweat can cause friction between your liner and your skin, which could lead to the formation of blisters. Blisters can take a long time to heal, and if they burst can become infected.
If blisters or other skin breakdown occurs, your physician or prosthetist may suggest not wearing the prosthesis and staying off your feet for a few days to allow it to heal.
Secondly, excessive sweat buildup in the liner can cause the liner to slide on the skin. This can affect suspension on your leg, and can cause shear forces which can lead to skin breakdown. Luckily, there are a few tips and tricks to managing and reducing the effects of sweat on your residual limb.
- Antiperspirants — There is a specific antiperspirant that we have found works very well for our patients called Certain Dri. It can be found in most drug stores and does not require a prescription. The important thing to remember when searching is to find an antiperspirant, not a deodorant. We typically suggest that our patients put Certain Dri on their limb at night after taking the liner off and cleaning their leg. After about 2 weeks of using this, our patients are typically seeing a dramatic reduction in sweat.Note: start on a small section of skin first to ensure that you will not have any adverse reactions.
- Liner liner — This is a very thin sock that goes between your leg and your liner. It will help to wick away moisture and reduce shear forces, which could cause skin breakdown. Most liner liners will have silver fibers to help eliminate odors as well.
- Suspension — There are certain types of suspension that can help reduce sweating, specifically vacuum suspension. An active pump in the prosthesis maintains negative pressure in the socket, meaning the limb will always be in close contact with the gel liner, preventing sweat glands from generating excessive moisture.
What NOT to do:
It is easy to be tempted to put baby powder or talc powder inside the liner to help absorb moisture.
However, the powder will just absorb the sweat and become a sticky paste inside the liner, making it uncomfortable and difficult to clean out. Additionally, using lotion before putting the liner on can increase the detrimental effects of sweat, such as skin breakdown or causing the liner to slide down your leg.
We typically encourage people to use lotion at night after cleaning their leg to allow time for the lotion to absorb into the skin. If you use lotion, use a non-scented lotion that is gentle on skin. Scented lotions can easily cause skin irritation, especially inside a hot and sweaty liner.
If you feel like you are having an issue with sweat, try these tips or speak to your prosthetist to find a solution specific to your needs.
It is critically important to maintaining a proper fit on daily basis. This is step one to most troubleshooting before other adjustments.
A prosthetic socket is designed to fit very tight. The tight fit is like a “bear hug” when someone lifts you off the ground. Most amputees do not weight bear on the bottom of their limb. This tight “bear hug” allows the compression of soft tissue to maintain a person’s weight hydrostatically. Socks worn within the prosthesis are critical to enhancing the fit of the prosthesis at any given time the individual is using the prosthesis. The constant pressure of the prosthesis on the limb will reduce the limb volume of the individual’s leg rapidly. This loss of volume will begin to make the prosthesis feel loose. A prosthetic sock will compensate for the lost volume and restore the tight fit.
Miscellaneous
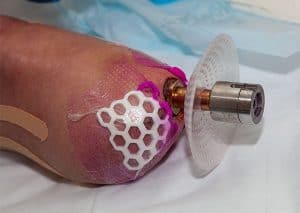
Osseointegration is a fairly new procedure for amputees that utilizes a titanium rod implanted in the bone of the residual limb to attach the prosthesis instead of a traditional socket. Over time, the existing bone grows into the titanium, creating a single structure that offers a number of advantages over a prosthetic socket including:
- Fast and easy donning/doffing
- No more fit issues due to weight gain/loss
- No problems with perspiration since no liners are required.
- No pressure sores or skin irritation.
- Better outcomes for hard-to-fit patients, such as those with very short residual limbs.
 Osseointegration can allow amputees that have had difficult fit issues in a traditional socket to wear a prosthesis for longer periods of time with greater comfort than a typical socket prosthesis. This procedure is offered for above and below-knee amputees and above and below elbow amputees.
This procedure is not for everyone. Diabetic patients and those with vascular complications are not typically good candidates at this time.